Thursday 28 February 2013

Striping Tape with Green, Black & Silver

a england striping tape

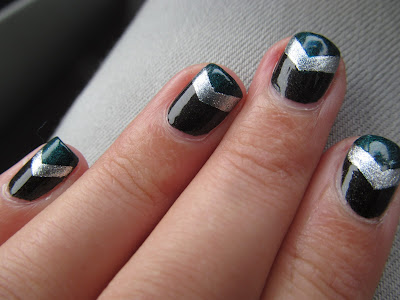
This design was made for Sophie's from myawesombeauty Competition.
The design was supposed to include tape, so I decided to do this beatiful design after dayss of considering many others - And I'm really satisfied with the results! 

I used first one coat of A-England Bridal Veil - Black with tiny holographic shredded glitters. 
Then I applies one thick coat of A-England - St. George - for the triangle. And on to of that between the two, added the silver thick stripe with Chic - 901. All of course with the help of striping tape. 
Hope you liked this design as much as I did! :) 

את העיצוב הזה עשיתי בשביל בתחרות בבלוג של סופי מהבלוג - myawesombeauty. 
העיצוב לתחרות היה צריך לכלול סלוטייפ, אז החלטתי לעשות את העיצוב המהמם הזה לאחר שבמשך ימים התלבטתי מה לעשות. אני מאוד מרוצה מאיך שהעיצוב הזה יצא בסוף! 

לשכבת בסיס השתמשתי ב - A-England Bridal Veil, שחור עם גליטרים גרוסים הולוגרפיים קטנטנים. לאחר מכן בעזרת הטייפ מרחתי שכבה עבה של A-England - St. George על מנת ליצור את המשולש. 
בין שניהם, הוספתי את הפס הכסוף עם שיק 901 גם כמובן בעזרת הטייפ - אני לא כזו מדוייקת :) 
מקווה שאהבתן את התוצאה, אני מרוצה.

a england striping tape

a england striping tape

a england striping tape

Wednesday 27 February 2013

Black and White Challenge - Day 9: Water Marble

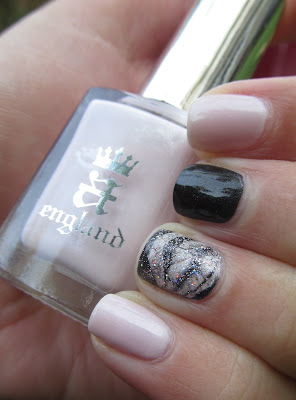
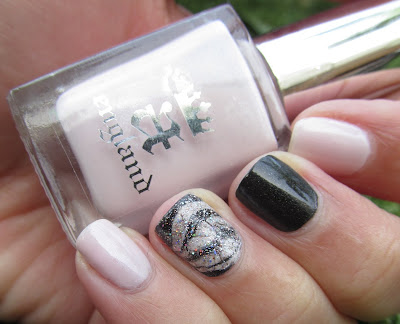
A-England Iseult Bridal Veil water marble

One before last day of the challenge! 
This was my first attempt with water marble, thanks to the challenge. It took me forever to figure out which of the polishes fit together. With some of the polishes, when I dropped the second drop they just wouldn't spread. So that took me quit a while. Once I passed that barrier, I managed to get this water marble done! 
I used A-England Iseult & Bridal Veil for the water marble, and topped it with GK hollographic glitters. 
You could tell that this is my first attempt, it's not perfect, but as you know, I like to show you things even when they are not perfect, it's ok to learn right? :) 

יום אחד לפני האחרון של האתגר! 
למען האמת זוהי הפעם הראשונה שאני מנסה לעשות water marble (לא יודעת מה התרגום העברי למען האמת), בזכות האתגר! לקח לי נצח לבדוק אילו לקים עובדים ביחד. עם חלק מהלקים, ברגע שמטפטפים את הטיפה השניה, היא פשוט לא מתפשטת יותר בתוך הלק השני. לא יודעת לומר למה, אולי זה עניין של פורמולה. ברגע שהתגברתי על המחסום הזה, הצלחתי לעשות את זה די בקלות. השתמשתי ב - A-England Iseult ו- Bridal Veil בשביל ה - water marble, ומעל זה מרחתי שכבה נדיבה של גליטרים הולוגרפים GK. לק תוצרת ישראל - שפשוט נראה נהדר! הייתי חייבת לרכוש אותו לאחר שנתקלתי בו לראשונה בבלוג של NailzCraze
אפשר לראות כי זהו הניסיון הראשון שלי, ושהוא לא מושלם. אבל אני מאמינה גם בלהראות את הדברים שלא מושלמים מאה אחוז, כי זה בסדר ללמוד ולהתנסות לא? :) 

A-England Iseult Bridal Veil water marble

A-England Iseult Bridal Veil water marble

A-England Iseult Bridal Veil water marble

Sunday 24 February 2013

Black and White Challenge - Day 8: Sponging

Well, Sorry that I was gone lately, test and everything. So.. I have some catching up do to with the black & white challenge. This post was actually meant to be uploaded on Valentines Day!
Well, better late than never,

אז נעלמתי קצת לאחרונה, זה כמובן בזכות תקופת המבחנים. אני צריכה לעמוד בקצב ולסיים את האתגר שחור לבן. הפוסט הזה היה אמור לעלות ביום האהבה, אבל, כן... זה לא קרה חח. עדיף מאוחר מאשר לעולם לא. 

Black and White Challenge - Day 8: Sponging gradient

Black and White Challenge - Day 8: Sponging gradient

So, for this design, I applied on the nails 2 coats of "life" white nail polish.
For the sponging I used 4 polishes - the same white one, KIKO 328 which is a light grey that I used here, NYX Dark Grey and "WOW Cosmetics" black polish.
For the little heart I used dotting tools, with Rimmel - double decker red - it is the perfect red!

לעיצוב הזה התחלתי בשתי שכבות של לק לבן של "לייף".
בשביל ליצור את הגרדיאנט השתמשתי ב-4 לקים - הלבן של לייף, KIKO 328 שהוא אפור בהיר שהשתמשתי בו גם כאן, NYX - Dark Grey ולק שחור של וואו. 
בשביל לצייר את הלב האדום השתמשתי במנקדים, עם Rimmel - double decker red - האדום המושלם! 

Black and White Challenge - Day 8: Sponging gradient

So, hope you all had a good valentines day =P.
מקווה שלכולכן היה יום אהבה שמח ומוצלח :) 

My Guest Post on NailzCraze Blog

Check my guest post on Natalie's blog! 
Natalie is a good friend and super talented! Be sure to follow her blog :) 
St. Patrick's day Inspired Nails! 


OPI – Live and Let Die Barry M Gold Foil Nailz craze stamping

Tuesday 12 February 2013

Firey Manicure with Laka Glitters


Laka - Gold French Laka 173 Barry M Gold Foil

Laka - Gold French Laka 173 Barry M Gold Foil

This is the design that I decided to create with 2 of LAKA's Glitters
On the ring finger, I applied one coat of Barry-M Gold Foil, and on top of that 2 layers of Laka - Gold French. On the middle finger I applied two coats of Laka 173, on top of black polish, on the other fingers I stamped with Barry-M Gold Foil the cute star made out of starts from Cheeky 52 plate, over black nail polish. What do you think? :) Thanks for reading. 

זה עיצוב שעשיתי עם עם 2 מהגליטרים של LAKA
על הקמיצה מרחתי 2 שכבות של הלק הזהוב Laka - Gold French, מעל שכבה אחת של Barry M - Gold Foil. על האמה מעל שכבה אחת (!!) של לק שחור של וואו, שמתי שתי שכבות של LAKA 173. בשאר האצבעות החתמתי עם אותו לק זהב של בארי אם, את הכוכב החמוד שעשוי מכוכבים מהדיסקית Cheeky 52, שוב מעל לק שחור של וואו. 
מה אתן חושבות? :) מקווה שאהבתן. 

Laka - Gold French Laka 173 Barry M Gold Foil

Laka - Gold French Laka 173 Barry M Gold Foil


Laka - Gold French Laka 173 Barry M Gold Foil


3 LAKA Glitters

Hello! Today I have for you 3 swatches of 3 glitter polishes from LAKA, an Israeli company, that does manicures and has their own brand! hope you enjoy it! 

שלום שלום :) אז סוף סוף התפניתי לצלם סווצ'ים ל-3 לקים גליטרים של LAKA. האמת שאת שלושתם קיבלתי מתנה מחברה, וזאת ההתנסות הראשונה שלי עם החברה. הגליטרים שלהם ממש מיוחדים בעיני. יש להם מגוון רחב של לקים, ואת השלושה האלה בחרתי כי באמת בלטו לעומת האחרים. אבל בהחלט ראוי לציין שיש להם מגוון מרשים, ועליי לחקור אותם קצת יותר לעומק :) 

LAKA Gold French

LAKA Gold French

LAKA Gold French

LAKA Gold French

Gold French, הוא לק עם גליטרים גרוסים בצבע זהב על בסיס שקוף, הגליטרים ממש עדינים ויפים. האמת שכאן בתמונה אני עם 4 שכבות לאטימות מלאה, אבל בנייל ארט שעשיתי השתמשתי ב-2 שכבות מעל לשכבה אחת של לק זהב. 

LAKA 163

LAKA 163

LAKA 163

LAKA 163

LAKA 163, הוא לק בסגנון קונפטי שכל החברות הגדולות כבר הוציאו בעבר, עם גליטרים סגולים, כחולים ואדומים על בסיס שקוף. לסווץ' מרחתי שתי שכבות, בחלק מהציפורניים הספיק אחד, תלוי כמה גליטרים הצלחתי לדוג. :) וזה מעל שתי שכבות של Zoya - Natty. כל הצבעים האחרים שרואים בתמונות זה מהשתקפות האור, התמונה האחרונה היא הכי משקפת את המציאות. השתמשתי בלק הזה במניקור קריסמס שעשיתי :) 

LAKA 173

LAKA 173

LAKA 173

LAKA 173

LAKA 173, הוא בהחלט האהוב עליי מבין השלושה. כלומר אני מאוד אוהבת את הקונפטי אבל הגליטר הזה יותר מיוחד. יש בו גליטרים קטנים בצבע נחושת וזהב, גליטרים גדולים יותר בצבע ורוד בהיר וגליטרים משושים גדולים בצבע ורוד כהה. הבסיס שלו אמנם לא שקוף אלא כתמתמם שכזה, שזה טיפה מגביל אבל על לק כהה כמו שחור בתמונה אז לא רואים. אני מניחה שגם אדום יהיה מתאים. נותן מראה אש כזה, מעניין. גם כאן השתמשתי בשתי שכבות. 

סכ"ה לקים ממש מעניינים, אהבתי שחברה ישראלית סוף סוף הוציאה גליטרים מעניינים. לקה מוכרים בדוכנים שלהם את הלקים אחד ב-30 ש"ח ו-3 ב-80 ש"ח. מקווה שנהניתן מהגוונים :) 


Friday 8 February 2013

Zoya Blaze

Zoya Blaze


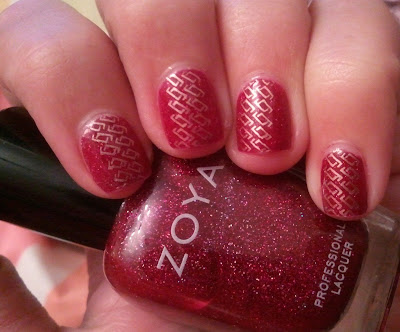
Well, as you may notices my nails are a lot shorter!! That's because one of them broke :( and I had no choice but to make them shorter. After this tragedy ;), I can go on and say - I'm in love.
I'm in love with Zoya!! I decided officially that this is my favorite brand. It's not easy to get them here in Israel, but here and there, you get the chances.
Here - with Zoya Blaze, you can see 2 coats. It's a jelly formula - very easy to work with and clean.
And the little holographic glitter - Love them!
I tries stamping with gold on top with Barry M Gold Foil - must say I liked it better without the stamp.

Hopefully I'll find time to write because I'm in my exams period and it's quit busy! hopefully this nightmare will end soon and I'll have more time than ever!

כפי ששמים לב בתמונות, הציפורניים שלי הרבה יותר ארוכות! אחת מהן נשברה, ולא הייתה לי ברירה אלא לקצר את כולן. וובכן, אחרי הטרגדיה הזו, אמשיך בנושא שלשמו התכנסנו - אני מאוהבת! 
אני מאוהבת במותג זויה, והחלטתי רשמית שזהו המותג האהוב העלי. לא פשוט להשיג אותם, אבל מדי פעם יש הזדמנויות, כשזה לא יוצא ייקר מדי.. ולרוב זה כן, לצערנו הרב. אז כאן עם Zoya - Blaze, מרחתי 2 שכבות. הפורמולה ג'לי ומאוד נוחה לעבודה וקל מאוד לנקות. לק פשוט מהמם!! הוספתי את החותמת בזהב, אבל אני חייבת לומר - הוא הרבה יותר יפה בלי החותמת. כמו שהוא לבד פשוט הורס. 

מקווה שלא אעלם יותר מדי ואמצא זמן בתוך התקופת מבחנים המטורפת הזו. בכל מקרה היא תיגמר בקרוב ויהיה לי הרבה יותר זמן סווצ'ים ונייל ארט! :) 


Zoya Blaze

Zoya Blaze

Zoya Blaze


Black and White Challenge - Day 7: Black & White with Glitters


Black and White Challenge - Day 7 Essie Beyond cozy

Black and White Challenge - Day 7 Essie Beyond cozy


So... This is Day 7.. Had a real trouble to think what to do for this one. But then I saw this mani here, and thought about doing my own version for the challenge! 
This is my second attempt with tape, and you can actually see it clearly in the picture. What can I say, it was the same with gradients though. It just takes some practice to really learn a method and doing it the right way. 
So for this design first I applied two coats of "life" white nail polish, and waited a whole hour for it to dry completely. to check if it was completely dry I tried to put tape and pull it to see if the nail polish remains clear. So I applied the black polish, and then I added Essie - Beyond Cozy without tape, just the corners there. Needed to add 2 coats of the glitter if I didn't want you to see the black underneath it. 
Hope you like this design, Hopefully Next time I'll do something with a tape it will look better =P

יום שביעי של האתגר... האמת שהיה לי לא פשוט לחשוב מה לעשות ביום הזה, ואיך לשלב גליטרים גם עם שחור וגם עם לבן. ואז נתקלתי בעיצוב הזה כאן, וחשבתי על לעשות גרסא משלי עבור האתגר! 
זה היה הניסיון השני שלי בעיצוב בעזרת סלוטייפ, ואפשר לראות די בבירור בתמונות שזה לא יצא כל כך מדויק. מה אפשר לומר, פשוט לוקח זמן עד שבאמת לומדים טכניקה חדשה ושהיא יוצאת באמת טוב ובצורה הכי מדויקת שיש. את אותו דבר חוויתי עם עיצובי גרדיאנט. פשוט לנסות שוב ושוב ובסוף זה מצליח! 
אז פה מרחתי שתי שכבות של לק לבן של לייף (בשביל לקים פשוטים אני לא רואה סיבה להוציא כסף על חברה יקרה כשלק זול עושה בדיוק את אותה עבודה), וחיכיתי שעה (!!) עד שהוא יתייבש לחלוטין. בשביל לבדוק אם הוא התייבש לחלוטין שמתי סתם סלוטיים ומשכתי כדי לראות שאכן הלק יבש ונשאר חלק לאחר המשיכה. לאחר מכן שמתי את הסלוטייפ, ומרחתי לק שחור של וואו. את Essie - Beyond Cozy מקולקציית החורף האחרונה, מרחתי כבר ידנית בלי סלוטייפ. שמתי כאן שתי שכבות על מנת שלא יראו את הלק השחור מתחת! וזהו, מקווה שאהבתן את העיצוב, בתקווה שפעם הבאה שאעשה עיצוב בעזרה סלוטייפ זה יראה יותר מדויק P=. 


Black and White Challenge - Day 7 Essie Beyond cozy

Black and White Challenge - Day 7 Essie Beyond cozy

Friday 1 February 2013

Black and White Challenge - Day 6: Color base with something white


Day 6 - Just wing it. I liked the combination of the two purples - MUA - Frozen Yogurt & Orly Wild Wisteria (which turns out to be a very useful polish!).
First I applied two coats of mua. Then sponged the two colors to create a gradient! I love the result, I feel like I finally mastered gradients! 
I would actually leave it as it is if it wasn't for the challenge, but... yeah. I added the white butterflies from BM-307 plate. Hope you like this design! :) 

יום מס' 6 של האתגר, החלטתי לזרום. אהבתי את השילוב של שני הסגולים האלו, MUA - Frozen Yogurt & Orly Wild Wisteria. הלק של אורלי מתגלה כאחד הלקים השימושיים שיש לי באוסף! הוא טוב להחתמות, לגרדיאנט, באמת אחד הטובים. 
אז התחלתי בשתי שכבות של הלק של מואה, ולאחר מכן הוספתי עם ספוג את שני הצבעים על מנת ליצור מראה אחיד. אני ממש מרוצה מהתוצאה הסופית ומרגישה שסוף סוף עיצובי גרדיאנט יוצאים לי טוב! 
האמת שהייתי משאירה את הגרדיאנט הסגול הזה כמו שהוא לולא האתגר, אבל בכל מקרה, הוספתי את הפרפרים מדיסקית BM-307 בלבן... :) 
מקווה שאהבתן :) 


Mua frozen yogurt gradient orly wild wisteria

Mua frozen yogurt gradient orly wild wisteria

Mua frozen yogurt gradient orly wild wisteria black and white challenge day 6

Mua frozen yogurt gradient orly wild wisteria black and white challenge day 6

Mua frozen yogurt gradient orly wild wisteria black and white challenge day 6

LinkWithin

Related Posts Plugin for WordPress, Blogger...