Showing posts with label purple. Show all posts

Saturday, 1 March 2014

OPI Brazil Collection Minis Swatches

OPI Brazil Collection Minis Swatches

So in today's post I have my swatches for OPI Brazil collection polishes* that come inside the mini set of this collection, with the cutest name ever - Copacababies. So Cute ^_^. 

Let's get right in to it. 

אז בפוסט היום, סווצ'ים ללקים בקולקציית ברזיל של OPI, שבאים כחלק מהסט מיני* של הקולקצייה, עם שם כל כך חמוד - Copacababies. כל כך מתוק ^_^. 

אז קדימה... לעניינים. 

OPI Brazil Collection AmazON... AmazOFF Swatch

OPI Brazil Collection AmazON... AmazOFF Swatch

OPI Brazil Collection AmazON... AmazOFF Swatch

AmazON... AmazOFF, is a beautiful turquoise green, with a little bit of a shimmer that you can see in the sun. I was surprised from this color, I was expecting a dark forest green and ended up with an amazing turquoise. I love it! beautiful formula - 2 layers for full coverage, that is the case in all of the creams BTW. 
A very similar polish, a bit lighter is Wet n' Wild - Miami Spirit from the Fergie Collection. 

AmazON... AmazOFF הוא גוון ירוק-טורקיזי כהה, עם ממש מעט שימר שניתן להבחין בו בשמש. האמת שהצבע הזה הפתיע אותי כי מהסווצ'ים באינטרנט ציפיתי לירוק בקבוק כהה, וקיבלתי טורקיז יפיפה! אני ממש אוהבת אותו. הפורמולה נהדרת, 2 שכבות לכיסוי מלא - וזה אגב רלוונטי לשני הלקים הבאים גם כן. לק ממש דומה וטיפה יותר בהיר שיש לי באוסף הוא Wet n' Wild - Miami Spirit מהקולקצייה של פרגי. 

OPI Brazil Collection Where Did Suzi's Man-go? Swatch

OPI Brazil Collection Where Did Suzi's Man-go? Swatch

OPI Brazil Collection Where Did Suzi's Man-go? Swatch

Where Did Suzi's Man-go? is an amazing orange mango color, and that was my favorite out of the four (and that is very unusual cos I'm a sucker for the turquoise shades). It is such a unique shade and I would defiantly recommend this color to everyone! I can't wait to use it in the summer\spring. 

Where Did Suzi's Man-go? הוא גוון כתום-מנגו מדהים, והוא היה האהוב עליי מבין הארבעה (וזה מאוד לא אופייני כי בד"כ הטורקיזים הם האהובים עליי). הגוון ממש מיוחד בעיניי, ולי אין משהו דומה לו באוסף. יש המון אפרסקיים, אבל זה באמת גוון ממש יפה, והייתי ממליצה לרכוש אותו. אני לא יכולה לחכות להשתמש בו בקיץ בנייל ארט! 

OPI Brazil Collection Kiss Me I'm Brazillian Swatch

OPI Brazil Collection Kiss Me I'm Brazillian Swatch

OPI Brazil Collection Kiss Me I'm Brazillian Swatch

Kiss Me I'm Brazillian, is a nice baby pink, more on the neon-y side. This is a very nice pink, but I'm sure you probably have some dupes for this one in your collection. 

Kiss Me I'm Brazillian הוא ורוד בייבי חביב, שנוטה יותר לכיוון הניאוני הייתי אומרת. הגוון מקסים, אבל אני בטוחה שכבר יש לכן דברים דומים באוסף, אני למשל מצאתי שג'ייד Candy pink מאוד דומה, קצת פחות ניאוני אבל ממש דומה. 

OPI Brazil Collection Next Stop... The Bikini Zone Swatch

OPI Brazil Collection Next Stop... The Bikini Zone Swatch

OPI Brazil Collection Next Stop... The Bikini Zone Swatch

Next Stop... The Bikini Zone, is my least favorite. I don't like this color, and I'll probably pass it on to a friend cos I know I won't wear it. It's a multichrome (sort of) purple shredded glitter, that's the best way I can describe it. It is very sheer I had to layer 3-4 layer (depends on how thick you apply your layers) and I didn't like this one at all! 

Next Stop... The Bikini Zone הוא הלק שהכי פחות אהבתי מבין הארבעה, וכנראה שאעביר אותו מהר מאוד לחברה כי אני יודעת שלא אשים אותו. הוא סוג של מולטיכרומי, עם גליטרים סגולים גרוסים, זו הדרך הכי טובה שמצאתי לתאר אותו. הוא מאוד דליל והייתי צריכה למרוח 3-4 שכבות לכיסוי מלא. בקיצור - לא אהבתי! 


***

Did you purchase\try any polishes from this collection? which one's are you fav's? 

אשמח לשמוע האם רכשתן לקים מהקולקצייה, או מה הייתן רוצות לרכוש? 
כבר יש אותם בחלק מהסניפים של רשת אפריל בארץ, אבל יותר זול כמובן לרכוש אונליין. 

*Product provided for review; הלקים התקבלו לסקירה

Friday, 28 February 2014

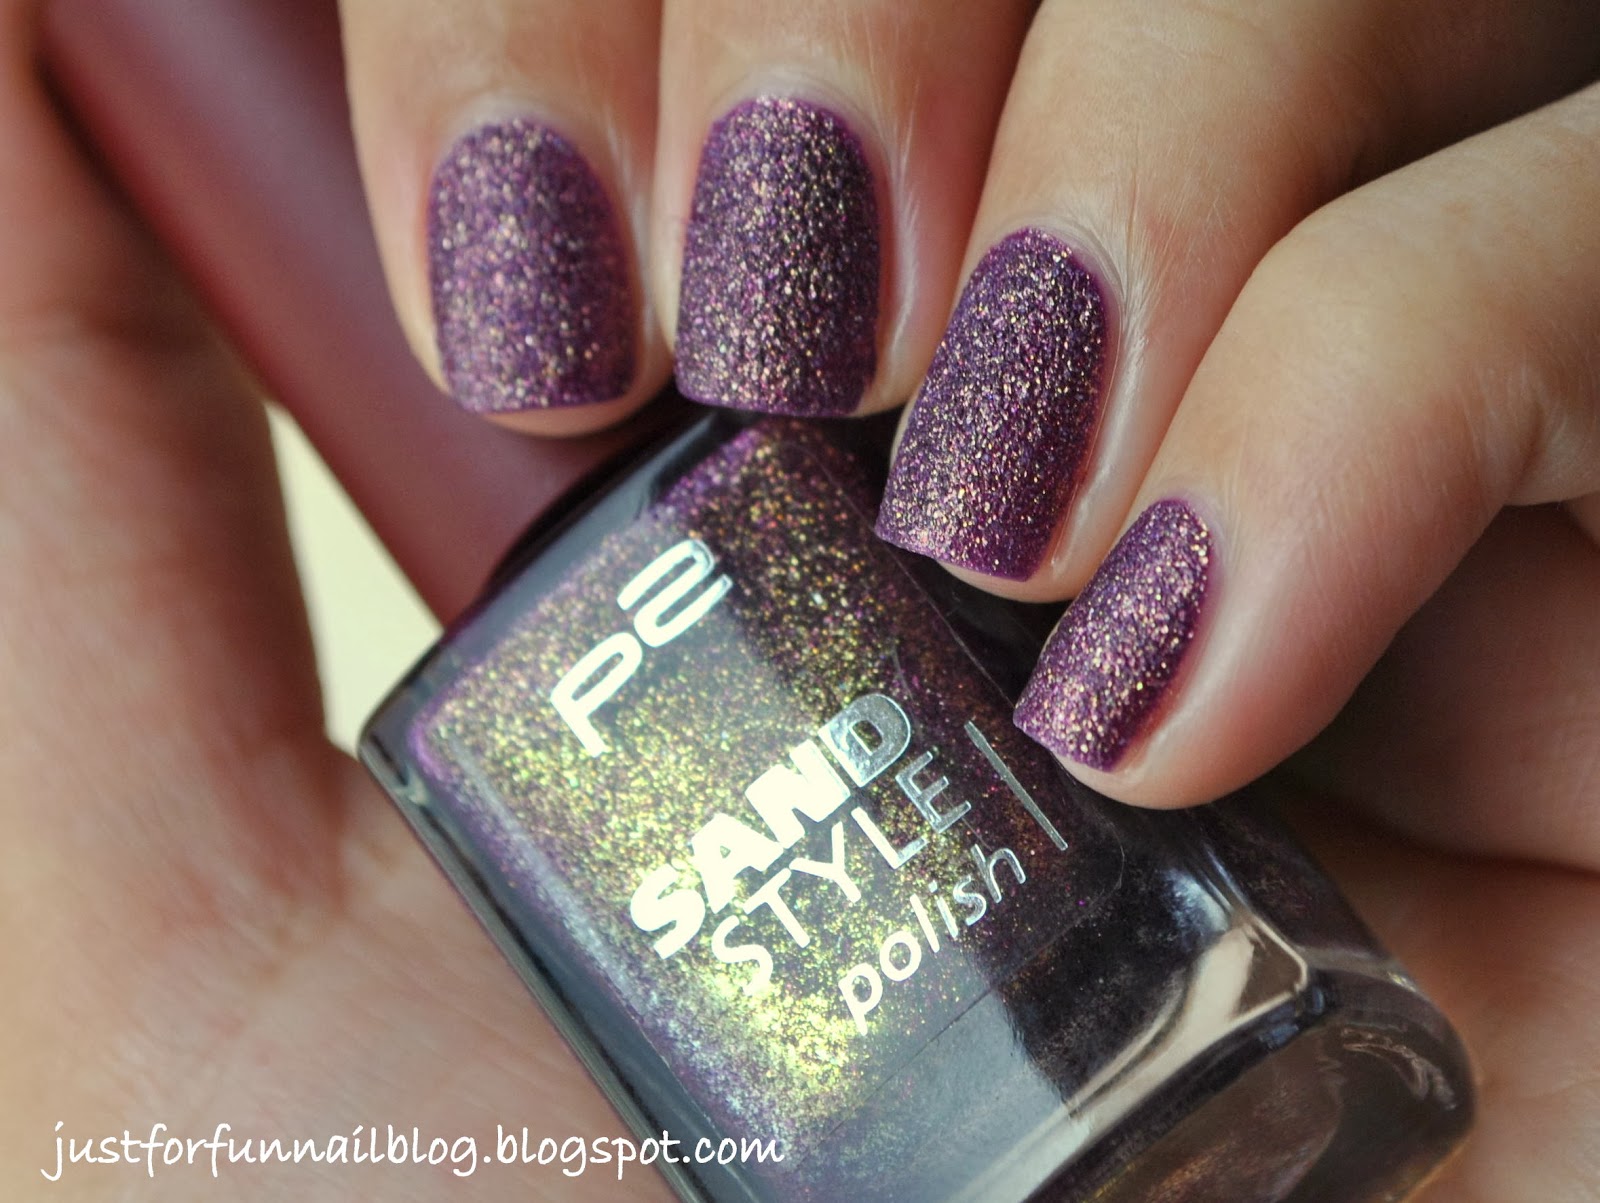
P2 Sand Style - Seductive: Swatch + Review

P2 - Sand Style Polish - 030 Seductive swatch

Quick swatch for this beauty.

P2 - Sand Style Polish - 030 Seductive. 

  • Purple sheer base, with purple glitters and a gold shimmer.
  • 3 layers. 
  • No top coats.
  • Dries completely after 20 minutes. 
  • Loved it! 


P2 - Sand Style Polish - 030 Seductive swatch

P2 - Sand Style Polish - 030 Seductive swatch

P2 - Sand Style Polish - 030 Seductive swatch

Thursday, 13 February 2014

Week of Love V'day Nail Art Challenge - Day 4 - Hearts


Week of Love V'day Nail Art Challenge - Day 4 - Hearts

Well, this is one of those manicure that I really really liked, but I feel that the pictures don't do it any justice at all! You have to believe me it is so beautiful in reality :) 
I got the idea from here, I thought it is so cute, original and simple :) 
Let me know what you think of the heart? do you like it or do you think it looks messy? 

The base polish is Catrice - Lilactric : Amazing polish! I applied 3 coats for full coverage. 
The glitter polish that I used for the glitter gradient is Shimmer - Karen
The gold polish is Barry M - Gold Foil. 
And the sequins are from bornprettystore (don't forget to use my discount code 10% HNL91). 

Thank you for stopping by <3 Don't forget to check out other heart themed mani's down below :) 

Week of Love V'day Nail Art Challenge - Day 4 - Hearts

Week of Love V'day Nail Art Challenge - Day 4 - Hearts

Week of Love V'day Nail Art Challenge - Day 4 - Hearts


Monday, 13 January 2014

OPI - Do You Lilac It: Swatch & Design


purple nails with OPI - Do You Lilac It

For this nail art I used *OPI - Do You Lilac It? It's a very springy sort of color, but sometimes it's nice to go for a lighter color in the middle of the winter!
I first Swatched it on it's own for you guys to see the color. Very nice purple, nothing that we haven't seen before, but still, good color, good formula, everyone need a color like that in their collection. I have a very similar color by Sinful colors, that I used in this design.

לנייל ארט הפעם השתמשתי בלק OPI - Do You Lilac It?*. הסגול בגוון אביבי למדי, אבל לפעמים זה נחמד לשים צבע בהיר יותר סתם ככה באמצע החורף! 
עשיתי סווץ' של הצבע לבדו כדי שתוכלו להתרשם מהצבע. הגוון הסגול מאוד נחמד, לא משהו שלא ראינו בעבר, אבל עדיין, גוון יפה, פורמולה מצויינת, וזה צבע שכל אחת צריכה באוסף הלקים שלה. יש לי לק מאוד דומה של sinful colors  שהשתמשתי בו בעיצוב הזה

OPI - Do You Lilac It swatch

OPI - Do You Lilac It swatch

For the design I left the thumb & the index finger plain. On the middle finger nail I applied a holographic purple by Pupa. On the ring finger I applied one coat of the Barry M - Diamond Glitter, that has hexagon & tiny silver holo glitter. And on the pinky, I stamped a nice little butterfly design with Orly Wild Wisteria
Thank for reading! Have a great week! 

לעיצוב המעניין יותר, השארתי את האגודל והאצבע כמו שהן. על האמה מרחתי לק הולוגרפי סגול של פופה
על הקמיצה מרחתי מעל הלק הסגול את  Barry M - Diamond Glitter שהוא גליטר הולוגרפי כסוף, עם גליטרים משושים בינוניים וקטנים. ולבסוף על הזרת החתמתי את דוגמת הפרפרים החמודים עם Orly Wild Wisteria.
תודה רבה שקראתן, ושיהיה שבוע נפלא! 

purple nails with OPI - Do You Lilac It

purple nails with OPI - Do You Lilac It

*product provided for review; המוצר התקבל לסקירה


Saturday, 11 January 2014

About Matte Top Coat.. (And A Wintery Matte French Manicure)


Matte French Manicure

I got this Matte top coat by OPI* for review, and I thought to my self - I already have the Essie - Matte about you that I bought a while ago, what could be any different about this one?. Well, It managed to surprise me because it was awesome!

First of all, The Formula - OPI Matte top coat is a lot less milky than the Essie one, and the whole formula is less thick and easier to work with. Secondly, OPI dries a lot quicker, and I mean a lot! I can't Imagine myself using Essie Matte about you again after I've tried this one by OPI. It is ten times better! 

I can't tell you anything about how long it is lasting but matte coats are not meant to extend how long the polish is lasting, they just help to create the matte finish. If I want the manicure to last long what I do id first put on a regular top coat like Seche Vite, and then after it dries I apply the matte one. That way you can get both effects - long lasting and beautifull matte finish for your polish. 

For this post's mani I created a Matte French Manicure! 
The base color I applied two coats of this cream dark burgundy purple by wow cosmetics 313. I think this is such a gorgeous color for winter and it really looks great with a matte finish. Then I applied OPI Matte top coat just on the tip. I actually did not move the brush from one side of the nail to the other, I held the brush still and turned my finger. I find it easier and less "shaky" to do a french tip this way. 

That's all for today thank you very much for reading! I would love to read about your experience with Matte top coats - the ones I mentioned or others.. :) 

כאשר קיבלתי את הטופ מאט של OPI* לסקירה,  חשבתי לעצמי - יש לי כבר טופ מאט של אסי בשם Essie - Matte about you שרכשתי בסופר פארם, עד כמה המוצר הזה כבר יכול להיות שונה ממנו?. אז מסתבר, שהמון! הוא הפתיע אותי ממש לטובה והוא פשוט אדיר! 

תחילה, אציין את הפורמולה, של OPI הרבה פחות חלבית מאשר הפורמולה של אסי, ובכלל הפורמולה הרבה יותר נוחה לעבודה. שנית, OPI מתייבש משמעותית מהר יותר מאסי, ההבדל הוא עצום. עם אסי חיכיתי יחסית הרבה זמן שיתייבש ופה באמת שתוך 5 דקות הכל היה יבש לחלוטין. אני לא מצליחה לדמיין את עצמי משתמשת שוב בטופ של אסי אחרי שניסיתי את של OPI. הוא הרבה יותר מוצלח! 

אני לא יכולה לתת חוות דעת על העמידות של הלק עם הטופ הזה כי לא בדקתי אותה, אבל למיטב הבנתי טופ מאט לא אמור להאריך עמידות כמו שחלק מטופים אחרים מבטיחים לעשות, אלא פשוט להעניק את הגימור המאט. הטיפ שלי להאריך עמידות הוא פשוט למרוח טופ רגיל, ולאחר הייבוש למרוח את הטופ מאט לגימור. ככה תקבלו את שני האפקטים - עמידות וגימור מאט! 

לפוסט הזה יצרתי מניקור פרנץ' מאט. הלק ששמתי בבסיס הוא Wow Cosmetics 313, שהוא לק קרמי בגוון סגול בורגונדי כהה. אני חושבת שזה צבע נהדר לחורף וכן שנראה מעולה עם גימור מאט, מדגיש את המראה ויוצר לוק מאוד קלאסי ויפה. אז כצפוי, מרחתי מעל על הטופ מאט של OPI. למעשה לא מרחתי את זה על ידי העברת המברשת מצד לצד, אלא השארתי את המברשת במקום וסובבתי את האצבע עצמה. אני חושבת שיותר קל ליצור ככה קו ישר ובלי רעידות. 

אז זהו להיום! מקווה שנהנתן מהפוסט ותודה שקראתן, ואני אשמח לשמוע על ההתנסות שלכן עם טופ מאט, של החברות שציינתי או אחרות (אני יודעת שיש אחד של שיק שלא הזדמן לי לנסות עדיין..) 


Matte French Manicure

Matte French Manicure

Matte French Manicure

*Product provided for review; המוצר התקבל לסקירה

Thursday, 28 November 2013

Glitterbunny New Black Friday Shades Swatches - Squishies!

Part of swatches for new Glitterbunny shades. After I showed you in my last post 5 shades, we have 2 more left. These two called Squishies. The new Squishies series are special jellies that are meant to be layered over holographic polishes. In one layer they change they change the color of the holo polish, gives it a jelly look and a glossy finish. In the pictures bellow I didn't apply ant top coat on in order to keep the holo effect, and also there's no need for top coat when the polish is this glossy.

חלק שני לסווצ'ים לגוונים החדשים של גליטרבאני. אחרי הפוסט של אתמול עם 5 גוונים, היום יש עוד שניים לסקור. השניים האלה הם בעצם מסדרה חדשה שנקראת "Squishies". סדרה זו היא בעצם סדרה של לקים ג'לים, שאותם אמורים למרוח מעל לקים הולוגרפיים. בשכבה אחת הם משנים את הצבע של הלק ההולוגרפי, מעניקים לו מראה ג'לי וגימור מבריק. בתמונות למטה, לא מרחתי טופ קואוט, גם על מנת לשמור על האפקט ההולוגרפי, וכן כי לא ראיתי צורך כאשר הלק מראה כל כך מבריק. 

Glitterbunny New Black Friday Shades Swatches - Squishies Jelliefish

Glitterbunny New Black Friday Shades Swatches - Squishies Jelliefish

Glitterbunny New Black Friday Shades Swatches - Squishies Jelliefish

Glitterbunny New Black Friday Shades Swatches - Squishies Jelliefish

The first one is a blue shade called Jelliefish. I love that name! ^_^. I layers this one over Color Club - Harp on it, a gorgeous silver holographic polish. On top I layered one coat of Jelliefish - and the result is before you. pretty cool ha?. 

הלק הראשון הוא בגוון כחול שנקרא Jelliefish. אני מתה על השם הזה ^_^. מרחתי אותו מעל Color Club - Harp on it שהוא לק הולוגרפי כסוף. מרחתי שכבה אחת של Jelliefish - והתוצאה לפניכן. די מגניב לא? . 

Glitterbunny New Black Friday Shades Swatches - Squishies Sourjellie

Glitterbunny New Black Friday Shades Swatches - Squishies Sourjellie

Glitterbunny New Black Friday Shades Swatches - Squishies Sourjellie

Glitterbunny New Black Friday Shades Swatches - Squishies Sourjellie

The second one is Sourjellie, a pink shade jelly. I layered this one also over the Color Club silver holo, with  one thick coat needed. I must admit that this is my favorite between the two. It gives the silver holo a gorgeous pink shade. I really really like how it looks. And this dark pink shade is exactly my taste. You can really see hoe the polishes are really glossy, and there's no need for a top coat. 

הלק השני נראה Sourjellie, ג'לי בגון ורוד מהמם. גם אותו מרחתי מעל הלק ההולוגרפי הכסוף של קולור-קלאב, ורק שכבה אחת עבה הייתה נחוצה. אני חייבת להודות שהוא האהוב עליי מבין השניים. הוא נותן ללק ההולוגרפי גוון ורוד מעט כהה עמוק כזה, פשוט מהמם. אני מאוהבת בגוון ובמראה שהלק יוצר. בהחלט רואים שהלקים מאוד גלוסים ובאמת שאין צורך בטופ קואוט. 

Glitterbunny New Black Friday Shades Swatches - Squishies Sourjellie

Glitterbunny New Black Friday Shades Swatches - Squishies Sourjellie

Glitterbunny New Black Friday Shades Swatches - Squishies Sourjellie

I saved the best for the end! This is Sourjelly again, only this time it is layered over a blue holo - Dance legend - high voltage. I love (!!) how this transforms the color into a gorgeous glossy purple. 
When you layer this over a blue polish, be careful not to apply too much on because it might ruin the effect. You really have to put one one thick coat, not to thick and not too thin, this will keep the holographic effect as you want it to be. 

All Glitterbunny polishes can be purchased at their online shop. Be sure to check out all the Black-Friday offers here. Be sure to go to their Facebook page for updates and any inquiries you may have. Thank you so much for visiting, and tomorrow I'll upload some extra swatches for the glitter! 


שמרתי את הכי יפה לסוף! זהו Sourjelly שוב, רק שהפעם מרחתי אותו מעל לק הולוגרפי כחול - Dance legend - high voltage. אני כ"כ אוהבת איך שהוא משנה את הצבע לסגול גלוסי יפיפה. 
כאשר אתן מורחות אותו מעל לק כחול, יש לשים לב שלא מורחים שכבה עבה מדי כי זה עלול להרוס את האפקט ההולוגרפי. על מנת לשמור עליו יש למרוח שכבה שכבה, לא עבה מדי ולא דקה מדי על מנת לקבל את האפקט שאנו רוצות שיהיה. 


את כל הלקים של Glitterbunny ניתן לרכוש באתר החברה. לא לשכוח לקרוא על כל המבצעים המיוחדים שיש לכבוד Black-Friday כאן. בנוסף לא לשכוח לעשות לייק לדף הפייסבוק של גליטרבאני כדי לקבל עדכונים ולקבל מענה לכל שאלה שעולה לכן. 
תודה רבה רבה שקראתן, ומחר יעלה החלק השלישי והאחרון, כמה סווצ'ים נוספים ללקים הגליטרים!

*Polishes provided for review; הלקים התקבלו לסקירה


Monday, 25 November 2013

BornPrettyStore Neon Studs Mani!

purple gradient with bornpretty neon studs

Today I'm with a manicure that I love! first of all because it's purple :) but second, because it has neon studs that I've been wanting to try for quite a while. I don't know about you, but I'm realy uncomfortable wearing studs that are to big, too blingy and too out there. I preffer the more solid look and feel on the nail. When I first saw these neon studs at the nailasaurus, I liked them a lot because they are not too big but still noticeable and adds a special touch to your manicure. 

For this design, first I applied 2 coats of the lightest color Sinful colors - Tempest. Then added the gradient with the two darker shades sinful colors - amethyst and orly - wild wisteria. After I applied the first coat of a top coat that will blend the gradient nicely, I placed very gently with my finger the purple neon studs*. 
In my ring finger I just applied a black base from wow cosmetics. On top of everything I applied one more coat of top coat and it was very helpful - this manicure stayed put with no chips or anything for 4 days until I replaced it. 

You can find the neon studs in bornprettystore. I like the round shape better but there are also square ones. you can get them either at small packages with one color or a wheel with different colors. It costs 7.59$, the shipping in free world wide. You can get a 10% discount with the code HNL91. 

***

אז היום אני עם מניקור שאני מאוד מאוד אוהבת. תחילה כי הוא סגול :) ושנית כי יש בו studs ניאון סגולים שאני רוצה לנסות כבר המון זמן. ה- studs הם בעצם העיגולים הניאונים הקטנים, תסלחו לי שאני לא מוצאת מילה טובה יותר בעברית עבורם. הם בעצם בסגנון הניטים, היהלומים והקישוטים התלת מימדיים למיניהם שיש לציפורן. אני לא יודעת איך אתן עם קישוטים תלת מימדיים לציפורניים, לי אישית קצת קשה עם זה. אני לא מסוגלת ללכת עם דברים יותר מדי בולטים, כבדים שמכסים חצי ציפורן. בקיצור, אני אוהבת דברים יותר סולידיים. כשראיתי את הקישוטים האלה לראשונה אצל הניילזאורוס, ממש אהבתי אותם בגלל שהם לא בולטים מדי והם קישוט עדין אך שמוסיף המון לעיצוב. 

לעיצוב הזה קודם כל מרחתי 2 שכבות של הלק הסגול הבהיר ביותר של sinful colors - tempest. לאחר מכן יצרתי את הגרדיאנט בגוונים נוספים כהים יותר של סגול: sinful colors - amethyst והכהה ביותר Orly - wild wisteria. הנה לינק למדריך לגרדיאנט שאני עובדת לפיו. לאחר שמרחתי טופ קואוט בפעם הראשונה על מנת לאחד את מעבר הצבעים של הגרדיאנט, הנחתי בעזרת האצבע מאוד בעדינות את ה-studs* הסגולים-פסטליים. באצבע המורדת השתמשתי בלק שחור של וואו. מעל הכל מרחתי עוד שכבה של טופ קואוט וזה ממש עזר לעמידות מכיוון שהמניקור הזה החזיק 4 ימים עד שהורדתי אותו בלי ציפים, נסיגות, פשוט בצורה מושלמת!

את ה- studs האלה ניתן למצוא באתר bornprettystore. אני אהבתי יותר את הצורה העגולה אבל יש אותם גם בצורת ריבוע. ניתן לקנות אותם בחבילות קטנות של כל צבע בנפרד או כגלגל עם צבעים שונים. הגלגל עולה כ-7.59$ והמשלוח חינמי לכל העולם. תוכלו לקבל 10% הנחה עם הקוד HNL91. 

purple gradient with bornpretty neon studs

purple gradient with bornpretty neon studs

I don't usually take photos of my right hand but.... Because I didn't have time do do gradient again I stayed with a simpler version of this mani on my right hand. I really liked this simpler version as well so I thought I'd share it with you. So if you don't have the energy to do a gradient, this looks really nice & elegant as well :) 

אני בד"כ לא מצלמת את יד ימין שלי, אבל הפעם חרגתי ממנהגי. מכיוון שלא היה לי זמן לעשות גרדיאנט גם על היד השניה, עשיתי גרסא יותר פשוטה ביד ימין. ממש אהבתי גם את הגרסא הפשוטה יותר של המניקור הזה ורציתי לחלוק אותה אתכן ולשמוע לדעתכן. לדעתי, אם אין לכן זמן או כוח לעשות גרדיאנט, זוהי גם לדעתי דרך לשלב את ה- studs במניקור :) 

purple gradient with bornpretty neon studs

*product was provided for review; המוצר התקבל לסקירה

Thursday, 14 November 2013

Multichrome November: Pupa - Deep Ruby (619)


Multichrome November: Pupa - Deep Ruby (619)

Pupa - Deep Ruby (619) is one of those polishes that looks so different in the bottle than what they actually look like on the nail. In the bottle this polish looks a lot different, more red & gold than purple. When you apply it, surprise surprise it is a very very dark purple shimmer. I looked for the red & golden shades, in the sun and in different angles. In sunlight you can notice the red shimmer, and even a little blue that you don't see in the bottle at all! 
Regardless to the differences between the shade in the bottle & on the nail, this nail polish is beautiful, quite vampy & dark & I love it! . The multichrome effect is not very noticeable compared to others, but you can see it in the sun at the pictures bellow. 

I had to upgrade this polish, and desided to add the designs from the beautifull NailzCraze Plate NC04 (in the last two pictures). I used Barry M - Gold Foil for stamping. 

Thank you for visiting and have a lovely weekend! 

(Pupa - Deep Ruby (619 הוא מסוג הלקים שנראים מאוד מאוד שונה בבקבוק לבין איך שהם נראים בפועל על הציפורן. בבקבוק הלק נראה שונה לגמרי, הגוונים הבולטים הם יותר אדום וזהב מאשר סגול. כאשר מורחים אותו, בהפתעה רבה מגלים לק שימר סגול כהה. חיפשתי את הגוונים האדומים והזהובים יותר, בשמש ובזוויות שונות. בשמש אפשר לראות מעט את השימר האדום, ואפילו מעט שימר כחול שאין לו זכר כשמסתכלים על הבקבוק! 

ללא קשר להבדלים בין איך שזה נראה בבקבוק לבין איך שנראה על הציפורן, זהו לק ממש יפה בעיני. מאוד "ערפדי", ואפל כזה ואני ממש אוהבת! האפקט המולטיכרומי לא מאוד בולט כאן בהשוואה ללקים אחרים, אבל אפשר בהחלט לראות קצת את הגוונים הסגולים והאדומים בתמונות למטה. 

הייתי חייבת להוסיף משהו למניקור, אז החתמתי בעזרת לק זהב -  Barry M - Gold Foil, דוגמאות מדהימות מהדיסקית NailzCraze Plate NC04. תוכלו לראות את העיצוב בשתי התמונות האחרונות. 

תודה רבה שקראתן וביקרתן ושיהיה לכן סוף שבוע מקסים! 


Multichrome November: Pupa - Deep Ruby (619)

Multichrome November: Pupa - Deep Ruby (619)

Multichrome November: Pupa - Deep Ruby (619)

Multichrome November: Pupa - Deep Ruby (619)

LinkWithin

Related Posts Plugin for WordPress, Blogger...