Showing posts with label black. Show all posts

Sunday, 19 January 2014

Nyx - Dorothy Swatch

Nyx - Dorothy Swatch

Short post today, a quick review of Nyx - Dorothy. 
I bought this polish in Warsaw this summer, and waited for the winter to use it because it is not a summer polish at all in my opinion. 

This polish has hexa & small squared red glitter, in a black sheer base. It's not a gelly base, just sheer. For that reason I layered it over one layer of a black polish underneath. Also, it reminds me of Revlon - Scandalous. I layered a top coat on top, and it made it look a lot prettier than without. 

It's not as pretty as I thought it would be, but still a very nice polish, very vampy & wintery. If you like that kind of look, I would recommend this to you. As for me, it's nice, but it didn't blew me away. 
You can find it, like all Nyx products in cherryculture.com.
Thank for visiting! :) have a great week. 

פוסט קצר היום, עם סקירה קצרה ללק Nyx - Dorothy.
את הלק הזה רכשתי בחנות של ניקס בוורשה בטיול שלי בקיץ, וחיכיתי לחורף להשתמש בו כי זה לק חורפי ולא קיצי כלל בעיני. 

הלק מורכב מגליטרים אדומים משושים וריבועים קטנים, בבסיס שחור שקוף למדי. לא ג'לי, פשוט שקוף יחסית. לכן מרחתי אותו מעל שכבה אחת של לק שחור. הוא מאוד מזכיר לי את  Revlon - Scandalous שגם ניתן למצוא בארץ. מרחתי מעל טופ, וזה עשה הבדל לטובה ונראה יותר חלק ומבריק עם טופ. בלי טופ הוא נראה מעט גושי. 

הוא לא יפה כפי שדמיינתי שהוא יהיה, אבל עדיין זה לק נחמד. מאוד ערפדי וחורפי, למי שאוהבת את המראה אני ממליצה על הלק. לדעתי הוא נחמד, אבל לא עפתי מה שנקרא. 
ניתן לרכוש אותו, כמו את כל המוצרים של ניקס באתר cherryculture.com.

תודה רבה שקראתן, שיהיה שבוע נהדר. 

Nyx - Dorothy Swatch

Nyx - Dorothy Swatch

Nyx - Dorothy Swatch


Wednesday, 30 October 2013

Cats Nails ~ Mew ^^

Cats Nails ~ Mew ^^ with DRK-A Stamping Plate

Well, it's obvious that I like cats :) I wanted to create another manicure with this stamp for a long time now (see the first mani with this cat stamp here). I like this stamp sooo much! I have 2 cats, and there's the cat in my parents house, I have a cat scarf, bag, shirt...... Anyone said obsession? LOL. 

Anyway, the base polishes that I used are by Wow cosmetics, black (393) & taupe (440). The black one is amazing, only one coat for full coverage. But it makes a bit of a mess when you're taking it off. 
The polishes that I stamped with are Konad & Moyou. And the gorgeous cats design is from DRK-A Stamping plate. 

What so you think? do you love this stamp as much as I do? :). Thanks for visiting as always.  

אז, זה דיי ברור שאני חולה על חתולים :) רציתי ליצור מניקור נוסף עם החותמת הזו כבר הרבה זמן (תוכלו לראות כאן את המניקור הראשון עם החותמת הזו). אני כ"כ אוהבת את החותמת הזו! אגזים ואומר שזו הסיבה המרכזית שרכשתי את הדסקה DRK-A. יש לי 2 חתולים בבית, ויש את חתולה אצל ההורים שלי, יש לי צעיף חתולים, תיק, חולצה.... מישהו אמר.... אובססיה קלה?! חח. 

בכל אופן, הלקים בבסיס העיצוב עם של וואו, שחור (393) וחום אפרפר (440). השחור פשוט מעולה, הוא נותן כיסוי מלא בשכבה אחת בלבד, מה שכן כשמורידים אותו הוא טיפה מלכלך. הלקים שהשתמשתי בהם להחתים הם של חברת קונאד וחברה בשם Moyou. ודוגמת החתולים היא מדיסקית DRK-A שהזמנתי מכאן.

אז... מה דעתכן? אתן מאוהבות הדוגמא הזאת כמוני?. תודה שביקרתן ושיהיה המשך יום נפלא. 

Cats Nails ~ Mew ^^ with DRK-A Stamping Plate

Cats Nails ~ Mew ^^ with DRK-A Stamping Plate

Cats Nails ~ Mew ^^ with DRK-A Stamping Plate

Monday, 23 September 2013

31DC2013 Day 23 - Inspired by a Movie


DC2013 Day 23 - Inspired by a Movie: X-Men

I think it's pretty obvious what movie I chose! :) 
For my X-men Manicure, I used Wow Cosmetics black nail polish. On my middle finger I drew with Sally Hansen Silver nail art pen, on my thumb I used BeautyCare polish num' 15. 
And on mu ring finger, I used Barry M - Silver Foil with striping tape to create wolverine's claws. I topped everything with Essie Matte about you top coat, for a leather look.  

DC2013 Day 23 - Inspired by a Movie: X-Men

DC2013 Day 23 - Inspired by a Movie: X-Men

DC2013 Day 23 - Inspired by a Movie: X-Men

Thursday, 19 September 2013

31DC2013 Day 18 - Half Moons

31DC2013 Day 18 - Half Moons

Just lately I discovered how much I love this design, and I was glad for the opportunity to try it again :)
I was actually inspired by Rihanna. I was looking pictures of her nail designs for nail designs forum.
I saw this design and it got me inspired and I wanted to try something similar since.
I love a great this looks, it's so classic and sophisticated and simple which is the best part.

The base color is Inglot 331, which I must say, after trying it more than once - I'm not a fan of it's formulla at all! But it is a perfect shade of pink so I got to love it.

31DC2013 Day 18 - Half Moons

31DC2013 Day 18 - Half Moons


Monday, 9 September 2013

31DC2013 Day 9 - Rainbow

31DC2013 Day 9 - Rainbow: black & rainbow sequins :)

Quick post -
The black polish is by Wow Cosmetics number 393. This black is so opaque I used only one coat. I love it!
The sequins are from bornprettystore. I applied these with a dotting tool, as seen in this tutorial.

31DC2013 Day 9 - Rainbow: black & rainbow sequins :)

31DC2013 Day 9 - Rainbow: black & rainbow sequins :)

31DC2013 Day 9 - Rainbow: black & rainbow sequins :)

Check out other colorful rainbow main's! 

Saturday, 7 September 2013

31DC2013 Day 7 - Black & White!


31DC2013 Day 7 - Black & White! Design from DRK-A stamping plate

My nails look like a fancy napkin :) And I LIKE IT!!!!
Very simple again - applied 2 coats of Life white nail polish (Israeli Brand).
Stamped with MoYou Black stamping polish this lovely pattern from DRK-A stamping plate.
If the top coat didn't smudge the stamp a little - it would be perfect. Luckily you can see it only of you're looking really close.
And... Yay it's been a week since the challenge started and I'm keeping up so well! I'm so proud of myself! Thank you for visiting as always!

31DC2013 Day 7 - Black & White! Design from DRK-A stamping plate

31DC2013 Day 7 - Black & White! Design from DRK-A stamping plate

Don't forget to check out more Black & White Designs! 

Saturday, 1 June 2013

Bourjois - Rainbow Apparition with Striping Tape

Bourjois - Rainbow Apparition

This was my weekend mani, which was much prettier in my head. Somewhere along the way with the cleaning & all the striping tape, it didn't come out so neat. You can see all the little imperfections without looking to hard in the pics. This is my first time using striping tape this way, and it wasn't as easy as I expected. And also, my nails are way to short at the moment for me to like them :( All these together made me a bit disappointed from the result. Yet again, I share it with you, and try to improve next time :) 

So, 3 coats of Bourjois - Rainbow Apparition, and after placing the striping tape, I applied one thick coat of wow cosmetics black nail polish. Topped with Seche-Vite top coat. Would like to read your comments, and thanks for reading as always! :) 

זה המניקור שלי לסופ"ש, שהיה הרבה יותר יפה כשדמיינתי אותו. איפשהו במהלך הביצוע, הניקיון, וכל הסלוטייפ, העיצוב לא יצא הכי נקי. ניתן להבחין בכל הפספוסים הקטנים בקצוות בתמונות בלי לחפש קשה מדי. זוהי הפעם הראשונה שאני משתמשת בסלוטייפ בצורה הזו, וזה לא היה כ"כ פשוט כמו שדמיינתי. בנוסף, הציפורניים שלי קצרות כרגע בצורה משמעותית (בטעות שייפתי אותן מעט יותר מדי - חייבת למצוא פצירה איכותית!) ומאוד קשה לי לחבב אותן כה :( כל אלו ביחד גרמו לי להיות מעט מאוכזבת מן העיצוב. אבל כרגיל, אני משתפת אותו כאן ומנסה להשתפר בפעם הבאה :). 

אז, 3 שכבות של Bourjois - Rainbow Apparition (שנקנה בארץ - כן כן! ), ולאחר ששמתי את הסלוטייפ הדק במקומו, מרחתי שכבה נדיבה של לק שחור של וואו. מעל מרחתי שכבה של המייבש  Seche-Vite. אשמח לקרוא תגובות והערות, ותודה שקראתן, שבוע טוב! 

Bourjois - Rainbow Apparition

Bourjois - Rainbow Apparition

Bourjois - Rainbow Apparition


Sunday, 5 May 2013

WNW Hannah Pinktana with Striping Tape

wet & wild - hannah pinktana

wet & wild - hannah pinktana

Not great photos of this one, but still such a pretty polish. 
you can see here 4 coats of the beautiful wet & wild - hannah pinktana. Added the black triangles to add some edge to it :) topped it with Poshe. Hope you liked it :) 

wet & wild - hannah pinktana

wet & wild - hannah pinktana

Friday, 29 March 2013

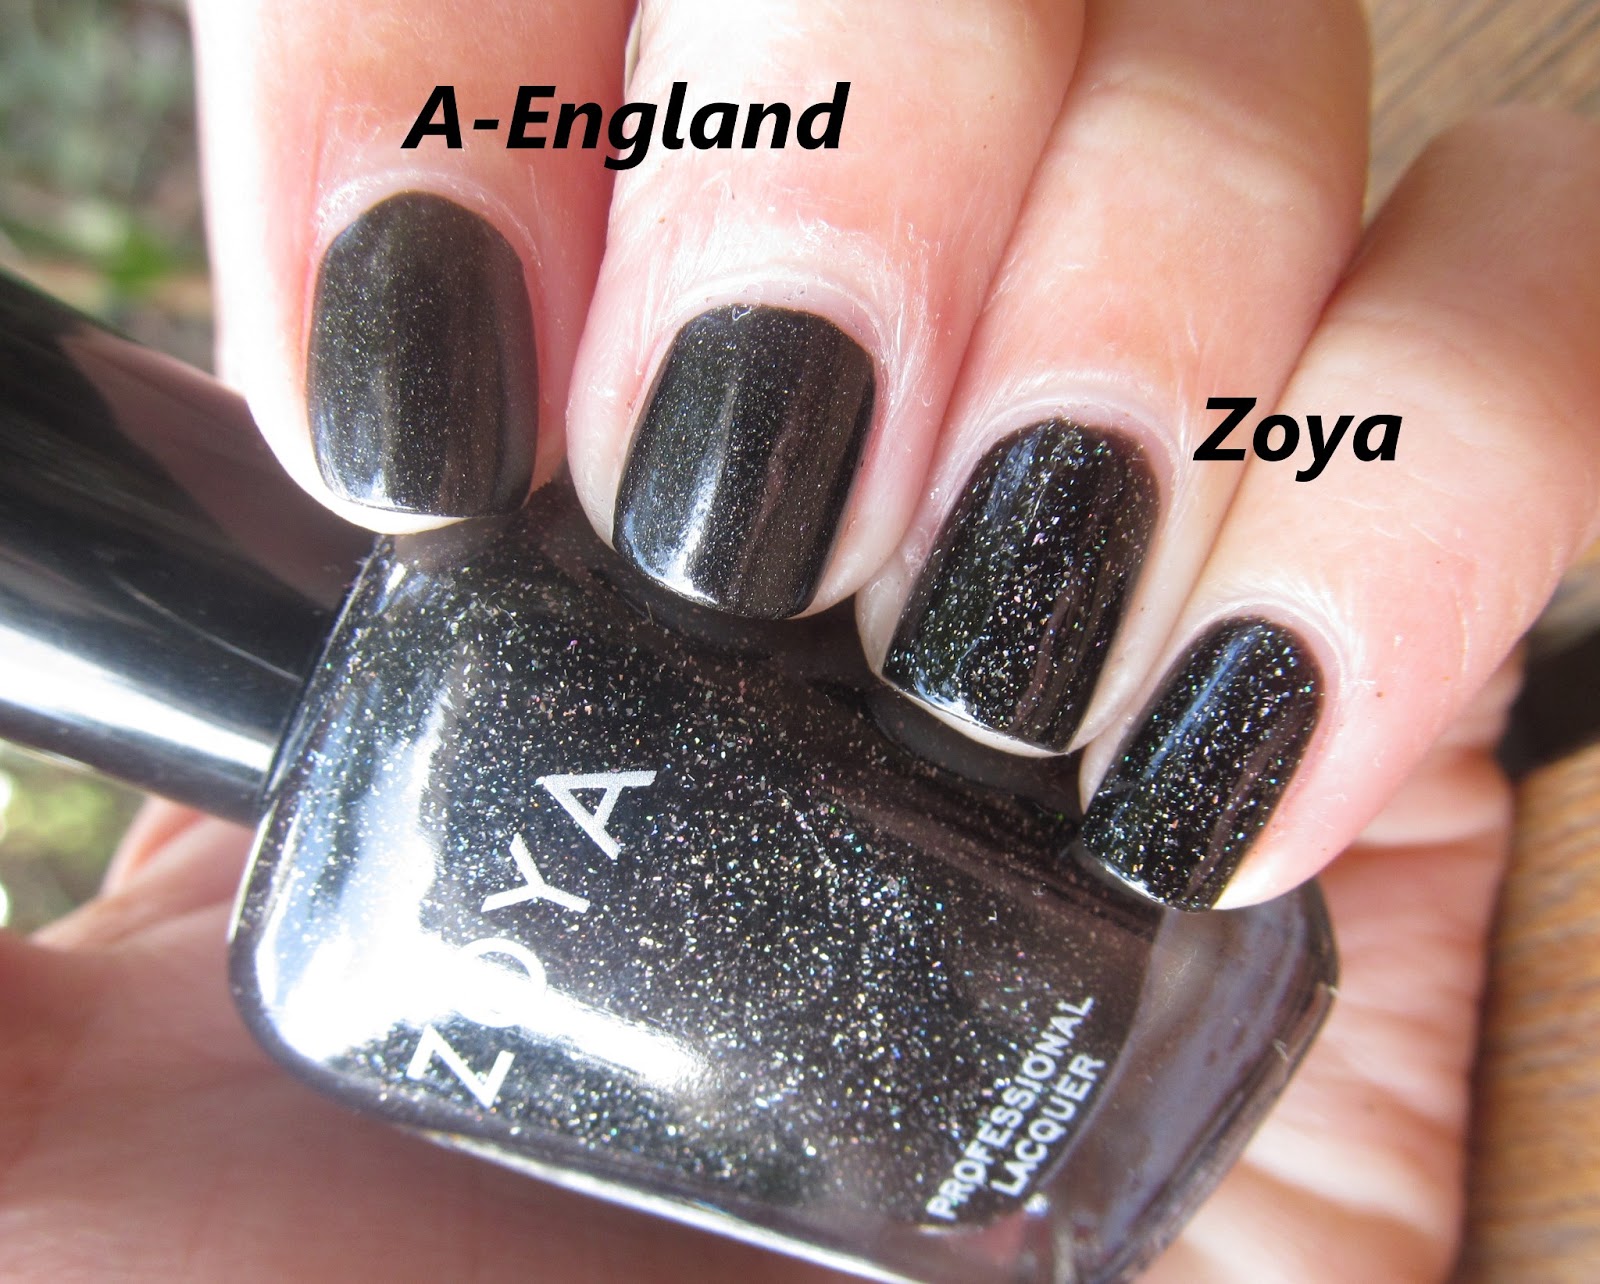
A-England Bridal Veil Vs. Zoya Storm

A-England Bridal Veil Vs. Zoya Storm

A-England Bridal Veil Vs. Zoya Storm

I've been wanting to do this comparison for a long time.
Both black, not Holo, but had holo glitters. The glitters in zoya are bigger, and more noticable, than the A-England ones. It is much more delicate.

In the pictures I applied two coats with both. Zoya is much more jelly thought than A-England which is more creamy. Both are extremely easy to clean for a black polish.

רציתי לעשות את ההשוואה הזו זמן רב. 
שניהם לקים שחורים, לא הולוגרפיים,אבל יש בהם גליטרים קטנים הולוגרפיים. הנצנצים בזויה גדולים ובולטים מאיי-אינגלנד, שהוא הרבה יותר עדין. 

בתמונות מרחתי 2 שכבות לאטימות. לזויה יש מרקם הרבה יותר ג'לי מאשר לאיי-אינגלנד שהוא הרבה יותר קרמי. ואת שניהם, ממש קל לנקות יחסית ללק שהוא שחור. 

A-England Bridal Veil Vs. Zoya Storm

A-England Bridal Veil Vs. Zoya Storm

Thursday, 28 February 2013

Striping Tape with Green, Black & Silver

a england striping tape

This design was made for Sophie's from myawesombeauty Competition.
The design was supposed to include tape, so I decided to do this beatiful design after dayss of considering many others - And I'm really satisfied with the results! 

I used first one coat of A-England Bridal Veil - Black with tiny holographic shredded glitters. 
Then I applies one thick coat of A-England - St. George - for the triangle. And on to of that between the two, added the silver thick stripe with Chic - 901. All of course with the help of striping tape. 
Hope you liked this design as much as I did! :) 

את העיצוב הזה עשיתי בשביל בתחרות בבלוג של סופי מהבלוג - myawesombeauty. 
העיצוב לתחרות היה צריך לכלול סלוטייפ, אז החלטתי לעשות את העיצוב המהמם הזה לאחר שבמשך ימים התלבטתי מה לעשות. אני מאוד מרוצה מאיך שהעיצוב הזה יצא בסוף! 

לשכבת בסיס השתמשתי ב - A-England Bridal Veil, שחור עם גליטרים גרוסים הולוגרפיים קטנטנים. לאחר מכן בעזרת הטייפ מרחתי שכבה עבה של A-England - St. George על מנת ליצור את המשולש. 
בין שניהם, הוספתי את הפס הכסוף עם שיק 901 גם כמובן בעזרת הטייפ - אני לא כזו מדוייקת :) 
מקווה שאהבתן את התוצאה, אני מרוצה.

a england striping tape

a england striping tape

a england striping tape

Tuesday, 12 February 2013

Firey Manicure with Laka Glitters


Laka - Gold French Laka 173 Barry M Gold Foil

Laka - Gold French Laka 173 Barry M Gold Foil

This is the design that I decided to create with 2 of LAKA's Glitters. 
On the ring finger, I applied one coat of Barry-M Gold Foil, and on top of that 2 layers of Laka - Gold French. On the middle finger I applied two coats of Laka 173, on top of black polish, on the other fingers I stamped with Barry-M Gold Foil the cute star made out of starts from Cheeky 52 plate, over black nail polish. What do you think? :) Thanks for reading. 

זה עיצוב שעשיתי עם עם 2 מהגליטרים של LAKA. 
על הקמיצה מרחתי 2 שכבות של הלק הזהוב Laka - Gold French, מעל שכבה אחת של Barry M - Gold Foil. על האמה מעל שכבה אחת (!!) של לק שחור של וואו, שמתי שתי שכבות של LAKA 173. בשאר האצבעות החתמתי עם אותו לק זהב של בארי אם, את הכוכב החמוד שעשוי מכוכבים מהדיסקית Cheeky 52, שוב מעל לק שחור של וואו. 
מה אתן חושבות? :) מקווה שאהבתן. 

Laka - Gold French Laka 173 Barry M Gold Foil

Laka - Gold French Laka 173 Barry M Gold Foil


Laka - Gold French Laka 173 Barry M Gold Foil


Friday, 8 February 2013

Black and White Challenge - Day 7: Black & White with Glitters


Black and White Challenge - Day 7 Essie Beyond cozy

Black and White Challenge - Day 7 Essie Beyond cozy


So... This is Day 7.. Had a real trouble to think what to do for this one. But then I saw this mani here, and thought about doing my own version for the challenge! 
This is my second attempt with tape, and you can actually see it clearly in the picture. What can I say, it was the same with gradients though. It just takes some practice to really learn a method and doing it the right way. 
So for this design first I applied two coats of "life" white nail polish, and waited a whole hour for it to dry completely. to check if it was completely dry I tried to put tape and pull it to see if the nail polish remains clear. So I applied the black polish, and then I added Essie - Beyond Cozy without tape, just the corners there. Needed to add 2 coats of the glitter if I didn't want you to see the black underneath it. 
Hope you like this design, Hopefully Next time I'll do something with a tape it will look better =P

יום שביעי של האתגר... האמת שהיה לי לא פשוט לחשוב מה לעשות ביום הזה, ואיך לשלב גליטרים גם עם שחור וגם עם לבן. ואז נתקלתי בעיצוב הזה כאן, וחשבתי על לעשות גרסא משלי עבור האתגר! 
זה היה הניסיון השני שלי בעיצוב בעזרת סלוטייפ, ואפשר לראות די בבירור בתמונות שזה לא יצא כל כך מדויק. מה אפשר לומר, פשוט לוקח זמן עד שבאמת לומדים טכניקה חדשה ושהיא יוצאת באמת טוב ובצורה הכי מדויקת שיש. את אותו דבר חוויתי עם עיצובי גרדיאנט. פשוט לנסות שוב ושוב ובסוף זה מצליח! 
אז פה מרחתי שתי שכבות של לק לבן של לייף (בשביל לקים פשוטים אני לא רואה סיבה להוציא כסף על חברה יקרה כשלק זול עושה בדיוק את אותה עבודה), וחיכיתי שעה (!!) עד שהוא יתייבש לחלוטין. בשביל לבדוק אם הוא התייבש לחלוטין שמתי סתם סלוטיים ומשכתי כדי לראות שאכן הלק יבש ונשאר חלק לאחר המשיכה. לאחר מכן שמתי את הסלוטייפ, ומרחתי לק שחור של וואו. את Essie - Beyond Cozy מקולקציית החורף האחרונה, מרחתי כבר ידנית בלי סלוטייפ. שמתי כאן שתי שכבות על מנת שלא יראו את הלק השחור מתחת! וזהו, מקווה שאהבתן את העיצוב, בתקווה שפעם הבאה שאעשה עיצוב בעזרה סלוטייפ זה יראה יותר מדויק P=. 


Black and White Challenge - Day 7 Essie Beyond cozy

Black and White Challenge - Day 7 Essie Beyond cozy

Friday, 25 January 2013

Black and White Challenge - Day 3: Black base with some color

This is a pretty simple design, but beautiful as it is simple. Over one coat of a simple black base, I applies two coats of Revlon Scandalous. I've had this polish for a while now and it is the first time I used it, I absolutely love it! I got a lot of compliments on this one. In the sun It looks beautiful. 

ליום השלישי של האתגר - בסיס שחיר עם צבע כלשהו מעל - הלכתי על עיצוב פשוט. אבל מהמחמאות שהלק הזה גרף, עד כמה שהוא פשוט כך הוא יפיפה! על שכבה אחת של לק שחור של WOW, מרחתי שתי שכבות של Revlon Scandalous. יש לי את הלק הזה זמן מה, וזה פעם ראשונה שאני שמה אותו והוא פשוט מקסים במיוחד בשמש כפי שאתן רואות בתמונה. 

Revlon Scandalous 761

Revlon Scandalous 761

Black and White Challenge - Day 2: White on Black

So... day 2 of the challenge! I decided to go with this black holo by A-England - Black Veil, and stamp this butterfly wing pattern using NC01 plate! I think the result is cute, though alot of  people didn't recognize at all that this is a butterfly wing, maybe because of the colors. any way, hope you liked it!

אז ליום השני של אתגר השחור לבן בחרתי בשחור ההולוגרפי של A-England העונה לשם Black veil, צבע מאוד עדין בעיני. החתמתי מעליו בלבן את דוגמת כנף הפרפר מדיסקית NC01 של NailzCraze. והנקודות הן גם עם אותו השחור. אני חושבת שהתוצאה הייתה חמודה, אבל מוכרחה להודות שהרבה בנות לא הבינו שמדובר בכנף של פרפר, מישהי אמרה לי שזה נראה כמו שיש שבור... O_o. כנראה שצריך לעשות את העיצוב הזה בצבעים קצת יותר קונבנציונליים על מנת שאנשים יבינו :). חח. בכל אופן מקווה שאהבתן את התוצאה!

A-England - Black Veil butterfly stamp

A-England - Black Veil butterfly stamp


A-England - Black Veil butterfly stamp

A-England - Black Veil butterfly stamp

LinkWithin

Related Posts Plugin for WordPress, Blogger...